Web Authenticator
Introduction
The Beyond Identity Web Authenticator is a web hosted version of our native platform authenticator running entirely in the context of a browser. It enables you to authenticate your users using cryptographically backed secure passwordless authentication without having to download the platform authenticator. Instead of a password or any shared secrets, a credential is created using asymmetrical algorithms provided by the Web Crypto API. Support for WebAuthn is coming soon.
The Beyond Identity platform has two components.
- A cloud based system where our OIDC IdP, analytics, auditing and policy reside. Beyond identity is implemented using the Open ID Connect protocol as specified in: OpenID Connect Core 1.0
- A client based Web Authenticator which could be:
- Stand-alone (Hosted) - The Web Authenticator implemented and hosted by Beyond Identity
- Embedded into a web client using our JS/TS embedded SDK (coming soon)
This guide provides information on how to implement the Beyond Identity Web Authenticator as the passwordless authentication method for a web application using the OIDC / OAuth2.0 protocol. If you have previous experience of integrating with a social provider for authentication then the process will be very familiar.
Prerequisites
- Access to a Beyond Identity tenant
- Access to a client library that implements the OpenID Connect standard in the implementer’s language of choice.
User Registration
To register new users for use with the platform authenticator you will need to create a self-service sign-up flow using the API or provision users manually via the admin console for testing purposes.
We have provided some guidance on how we recommended creating a self service sign-up flow with Beyond Identity's APIs. You can follow the User Sign-Up Flow guide or take a look at the Create User endpoint.
You can see an example self-service registration flow on the Live Demo Application we have provided.
Tenant Configuration
When implementing authentication with the Web Authenticator, users need to be redirected to the Web Authenticator during credential registration to ensure that the credential is registered in the web context. To do this, you need to ensure that the registration_redirect_uri value is correctly set in the tenant settings.
The registration_redirect_uri for the hosted Web Authenticator is https://authenticator.byndid.com/register
You can follow this guide on how to set the Registration Redirect URI correctly for your tenant. This guide also provides details on how to set the registration_redirect_uri when using both the Web and platform/SDK authenticators.
Authentication
Implementers of the authentication flow can use freely available open source OpenID Client libraries to initiate an authentication request against the Beyond Identity Cloud based OIDC IDP.
As an example if you wanted to implement Beyond Identity with a Node.js Web Application you can use the OpenID Connect middleware library openid-client. openid-client is a server side OpenID Relying Party (RP, Client) implementation for Node.js runtime, that supports passport.
You can also integrate Beyond Identity as a delegate Identity provider within your CIAM SSO. You can either follow the SSO integration guides provided under the 'SSO Integration' section or you can integrate using any generic OAuth2.0/OIDC connector within the SSO solution using the protocol information below.
OIDC Endpoints and Protocol Information
OIDC Configuration
All URLs used during the authentication sequence described in the next two sections can be found in the OpenID configuration.
| Beyond Identity endpoint | URL |
|---|---|
| Issuer | https://auth.byndid.com/v2 |
| Authorization endpoint | https://auth.byndid.com/authorize |
| Token endpoint | https://auth.byndid.com/v2/token |
| JWKS endpoint | https://auth.byndid.com/v2/.well-known/jwks.json |
| User Info endpoint | https://auth.byndid.com/v2/userinfo |
Token Response:
{
  "access_token": "<ACCESS_TOKEN>",
  "token_type": "Bearer",
  "id_token": "<ID_TOKEN>",
  "expires_in" "<TOKEN_EXPIRE_TIME_SEC>"
}
Only if openid is provided as a value in the scope parameter of the /authorize request will the id_token be returned in the response.
User Info Endpoint:
The UserInfo endpoint can be used to retrieve other values associated with the user account like email, external_id, internal_id and name. Calls to the User Info endpoint are authenticated by using the Access token returned from the Token endpoint above.
{
    "email": "<EMAIL>",
    "external_id": "<EXTERNAL_ID>",
    "id": "<INTERNAL_ID>",
    "name": "<NAME>",
    "preferred_username": "<EMAIL>",
    "sub": "<USERNAME>"
}
Add Device
Users can easily add an extension of the credential to other devices, both native apps with either the platform authenticator or the SDK installed and the Web Authenticator. This allows for users to permanently add another device(s) without the need to use a roaming authenticator every time on trusted devices. All device add operations run through the policy engine, meaning only devices which are "trusted" and meet policy can be added.
The terms inbound and outbound device add are used below, inbound refers to the operation of adding a credential to a browser which doesn't have a credential. Outbound refers to the operation of the user initiating a device add from the device/browser which already has the credential. The user will be need to perform both in order to complete a successful device add operation.
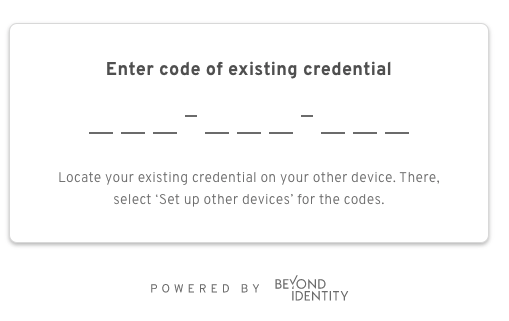
Inbound
When working with the hosted Web Authenticator you will need to redirect users to the import route of the Web Authenticator.
https://authenticator.byndid.com/import
Users will then be prompted for the 9 digit code shown on the device they are migrating from.
Outbound
Users can extend their existing credential to new devices by being redirected to https://authenticator.byndid.com/ and clicking "Set Up Other Devices" on the credential view.
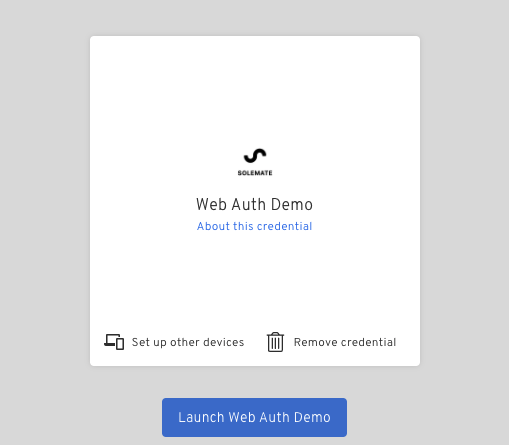
The 9 digit code will be displayed

User Recovery
You will need to implement a self-service recovery flow for users who no longer have access to their credential (lost/stolen device). We have provided some guidance on how we recommended creating a self service recovery flow with Beyond Identity's APIs. You can follow the User Recovery Flow guide or take a look at the Recover User endpoint.