Getting Started
In this guide we will show you how to create a tenant and connect a demo application to it. This app will demonstrate common workflows like creating a passkey and using it to authenticate.
1. Check the basics
The Beyond Identity Example Application is made up of a node.js backend and a angularjs frontend. You'll need standard developer tools to get it up and running.
macOS, Windows and Linux
Git: Download and install
git: https://git-scm.com/downloadscURL: Download and install
curl: https://curl.se/dlwiz/?type=binNodeJS: Download and install
nodejs: https://nodejs.org/en/download/
2. Download the example application
Clone the repo
The source code for the example application is hosted in Github.
git clone https://github.com/gobeyondidentity/getting-started.git
Change directory into the repo:
cd getting-started
3. Create a Tenant
Proceed to Create a Tenant.
Once your tenant has been created with Beyond Identity, you can continue to clone the app, get a tenant_id and API token.
4. Set your region
Set the REGION variable according to where your account was created:
- macOS
- Windows
export REGION="us" | "eu"
set REGION="us" | "eu"
5. Get your Tenant ID

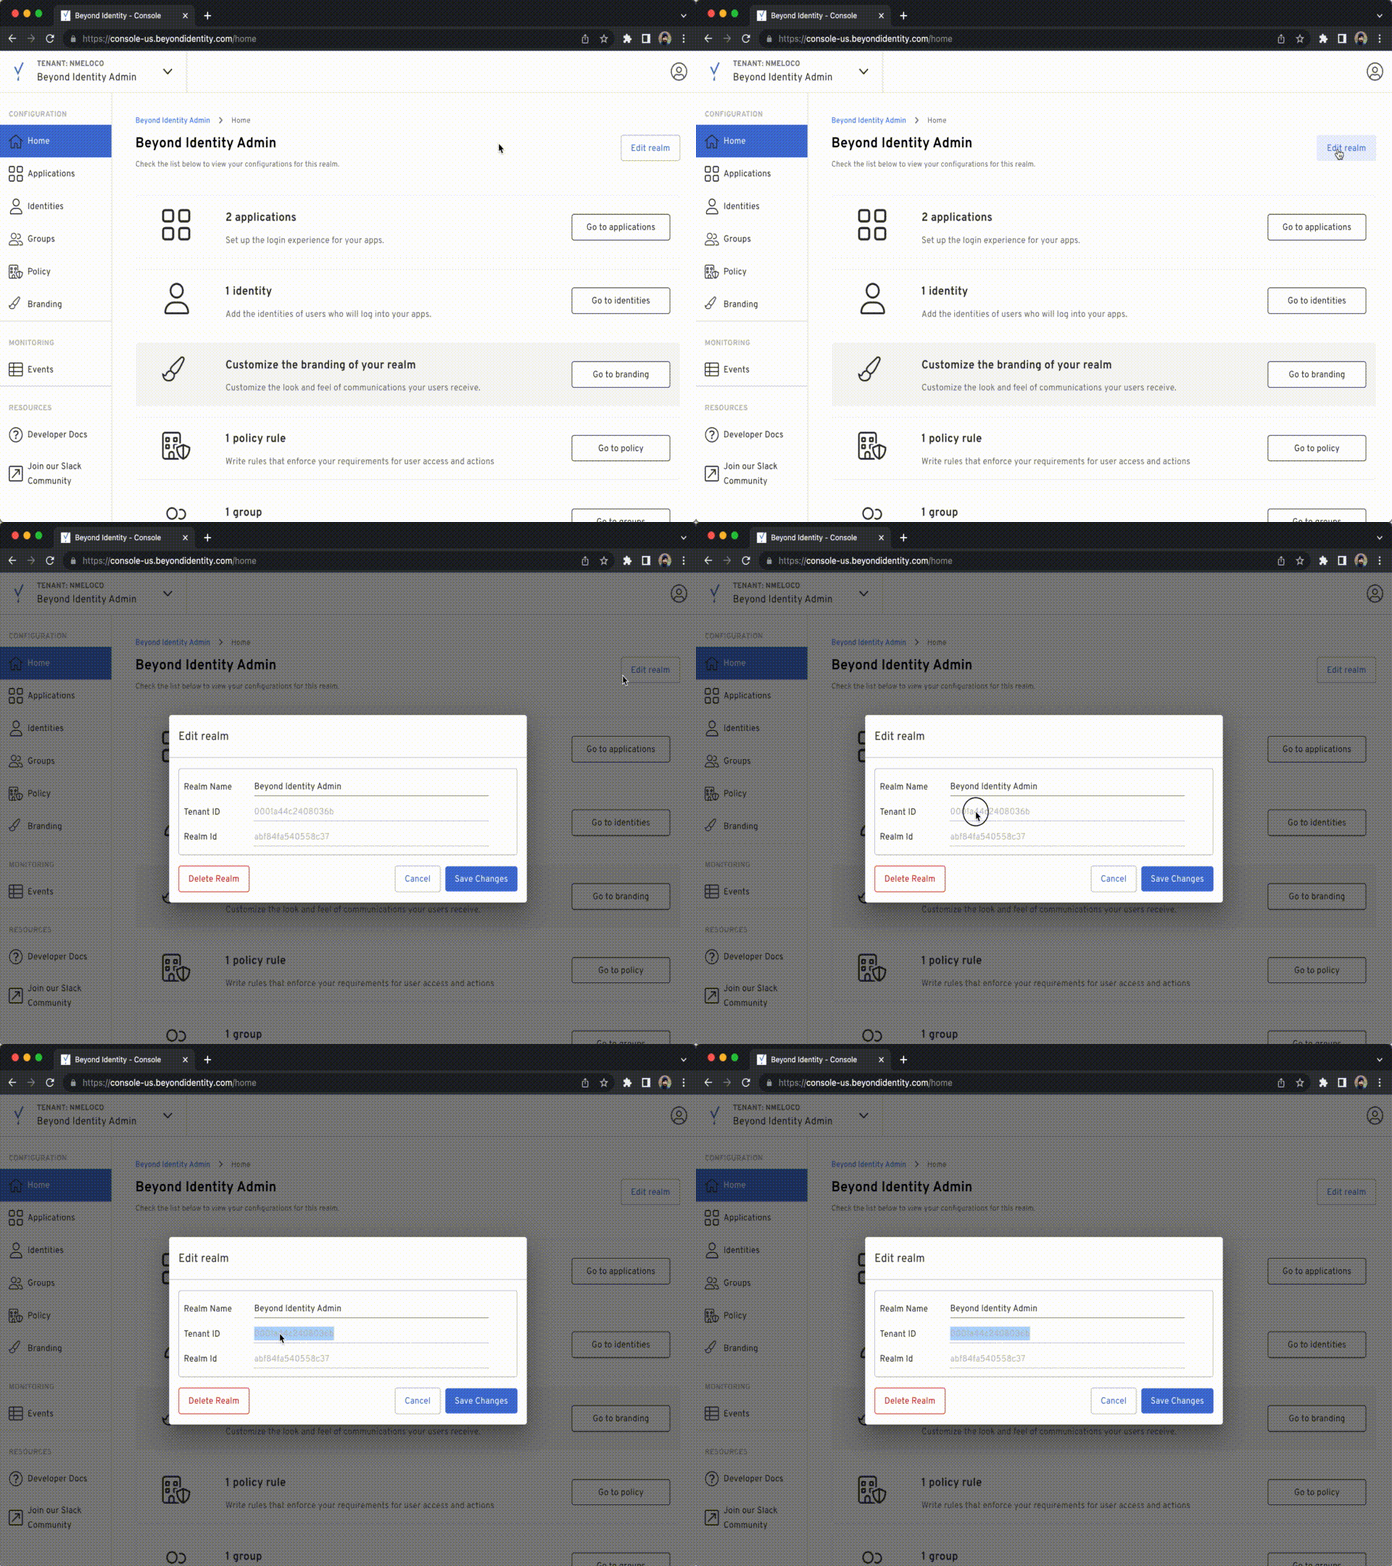
Log into the Admin Console, then to get your Tenant ID:
On the navigation bar to the left click Home.
Click Edit Realm on the top right side of your screen, copy the
Tenant IDvalue.Run the following command to configure the
TENANT_IDvariable:
- macOS
- Windows
export TENANT_ID=tenant_id from above
set TENANT_ID=tenant_id from above
6. Create an API token

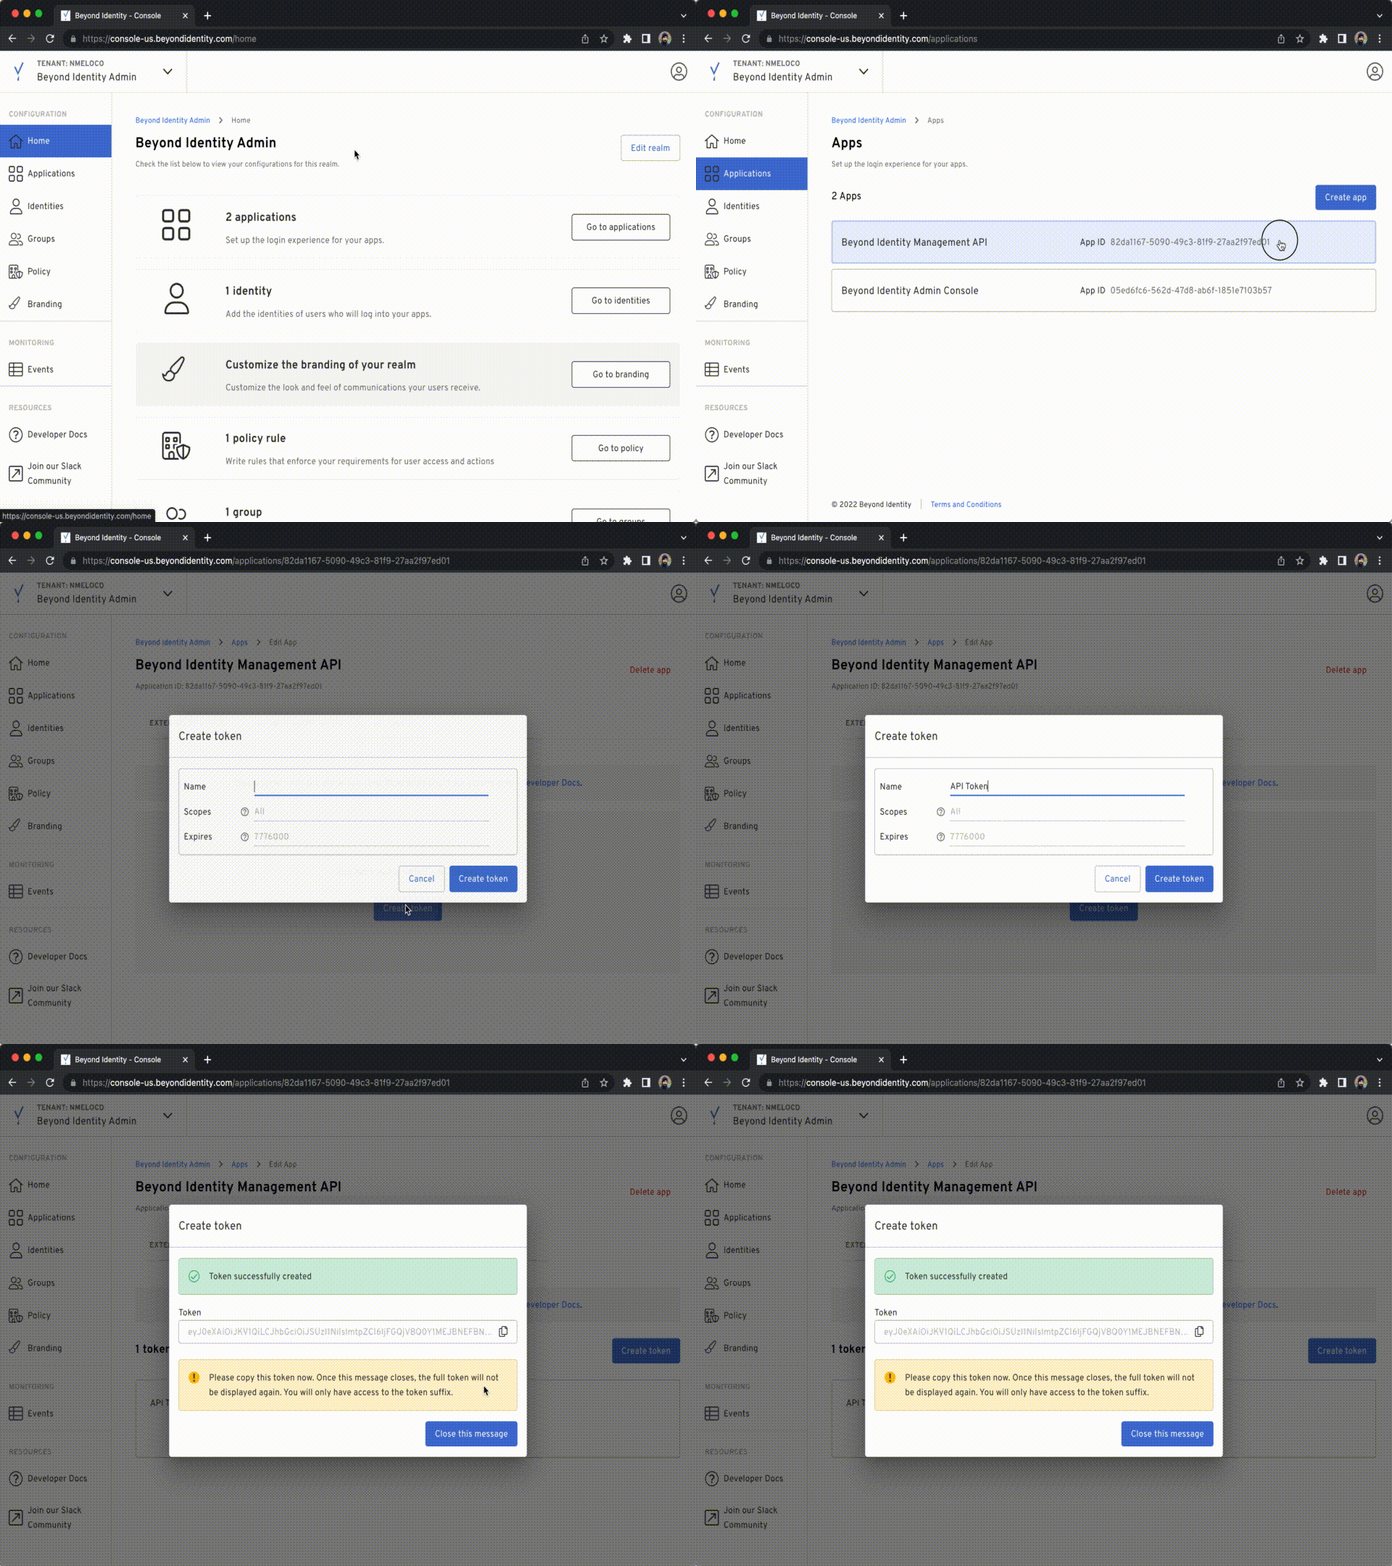
From the Admin Console, create an API Token for your tenant by:
- Click Applications.
- Click Beyond Identity Management API.
- Click API Tokens.
- Create a token and click the copy button, use the API Token to set the environment variables as shown below.
- Run the following command to set the
API_TOKENvariable:
- macOS
- Windows
export API_TOKEN=api-token from above
set API_TOKEN=api-token from above
7. Configure your local environment
Create a Realm
First, we need to create a new realm to hold identities and configuration:
Request
- macOS
- Windows
curl -X POST -H "Authorization: Bearer $API_TOKEN" -H "Content-Type: application/json" -d '{
  "realm" : {
    "display_name" : "Test Realm"
  }
}' https://api-$REGION.beyondidentity.com/v1/tenants/$TENANT_ID/realms
curl -v -H "Authorization: Bearer %API_TOKEN%" -d "{\"realm\" : { \"display_name\" : \"Test Realm\" }}" -H "Content-Type: application/json" https://api-%REGION%.beyondidentity.com/v1/tenants/%TENANT_ID%/realms
Example Response:
{
  "id": "76faedfb4342e82f", // <= copy REALM_ID from your response
  "create_time": "2022-07-12T21:34:37.427115Z",
  "display_name": "Test Realm",
  "tenant_id": "000191bbf35a63ac",
  "update_time": "2022-07-12T21:34:37.427115Z"
}
Copy the Realm ID from the response and set an environment variable for it:
- macOS
- Windows
export REALM_ID=realm-id from your response
set REALM_ID=realm-id from your-response
Create an Authenticator Configuration
See the advanced documentation for more details on Authenticator Configurations.
Request:
- macOS
- Windows
curl -X POST -H "Authorization: Bearer $API_TOKEN" -H "Content-Type: application/json" -d '{
"authenticator_config": {
  "config": {
  "type": "embedded",
  "invoke_url": "http://localhost:3001",
  "trusted_origins":["http://localhost:3002"]
  }
}}' https://api-$REGION.beyondidentity.com/v1/tenants/$TENANT_ID/realms/$REALM_ID/authenticator-configs
curl -v -H "Authorization: Bearer %API_TOKEN%" -d "{ \"authenticator_config\" : { \"config\" : { \"type\" : \"embedded\", \"invoke_url\" : \"http://localhost:3001\", \"trusted_origins\" : [\"http://localhost:3002\"] }}}" -H "Content-Type: application/json" https://api-%REGION%.beyondidentity.com/v1/tenants/%TENANT_ID%/realms/%REALM_ID%/authenticator-configs
Example Response:
{
  "id": "f90019f4-e9e4-4989-af17-7c7b531f7c2c", // <= copy AUTH_CONFIG_ID from your response
  "realm_id": "76faedfb4342e82f",
  "tenant_id": "000191bbf35a63ac",
  "config":
  {
    "type": "embedded",
    "invoke_url": "http://localhost:3001",
    "trusted_origins":
    [
      "http://localhost:3002"
    ]
  }
}
Copy the Authenticator Configuration ID from the response and set an environment variable for it:
- macOS
- Windows
export AUTH_CONFIG_ID=authenticator-config-id from your response
set AUTH_CONFIG_ID=authenticator-config-id from your response
Create an Application
Next, we'll create an Application. Applications hold the OpenID Configuration information needed to authenticate:
Request:
- macOS
- Windows
curl -X POST -H "Authorization: Bearer $API_TOKEN" -H "Content-Type: application/json" -d '{
  "application": {
    "authenticator_config": "$AUTH_CONFIG_ID",
    "protocol_config": {
      "type": "oidc",
      "allowed_scopes":[],
      "confidentiality": "confidential",
      "token_endpoint_auth_method": "client_secret_basic",
      "grant_type":["authorization_code"],
      "redirect_uris":["http://localhost:3001/auth/callback"],
      "token_configuration": {
        "expires_after": 86400,
        "token_signing_algorithm": "RS256",
        "subject_field": "USERNAME"
      }
    },
    "display_name": "Test Application"
  }
}' https://api-$REGION.beyondidentity.com/v1/tenants/$TENANT_ID/realms/$REALM_ID/applications
curl -v -H "Authorization: Bearer %API_TOKEN%" -d "{ \"application\": { \"authenticator_config\" : \"%AUTH_CONFIG_ID%\", \"protocol_config\": {\"type\" : \"oidc\", \"allowed_scopes\": [], \"confidentiality\":\"confidential\", \"token_endpoint_auth_method\" : \"client_secret_basic\", \"grant_type\": [\"authorization_code\"], \"redirect_uris\":[\"http://localhost:3001/auth/callback\"], \"token_configuration\": {\"expires_after\":86400, \"token_signing_algorithm\": \"RS256\", \"subject_field\":\"USERNAME\"}}, \"display_name\": \"Test Application\"}}" -H "Content-Type: application/json" https://api-%REGION%.beyondidentity.com/v1/tenants/%TENANT_ID%/realms/%REALM_ID%/applications
Example Response:
{
  "id": "845b9fc9-cb61-4892-8272-a9899657bef1", // <= copy APPLICATION_ID from your response
  "realm_id": "76faedfb4342e82f",
  "tenant_id": "000191bbf35a63ac",
  "protocol_config":
  {
    "type": "oidc",
    "allowed_scopes":
    [],
    "client_id": "8qwi78xeHtcgSmM16I3H7eNN",  // <= copy APP_CLIENT_ID from your response
    "client_secret": "KGkJiGVqdplvm_KtLZrpulckYsd6EFTwPHP9Ld6aa4aUDWqO", // <= copy APP_CLIENT_SECRET from your response
    "confidentiality": "confidential",
    "token_endpoint_auth_method": "client_secret_basic",
    "grant_type":
    [
      "authorization_code"
    ],
    "redirect_uris":
    [
      "http://localhost:3001/auth/callback"
    ],
    "token_configuration":
    {
      "expires_after": 86400,
      "token_signing_algorithm": "RS256",
      "subject_field": "username"
    }
  },
  "authenticator_config": "f90019f4-e9e4-4989-af17-7c7b531f7c2c",
  "is_managed": false,
  "display_name": "Test Application"
}
Set the AppID, Client ID and Client Secret environment variables
Copy the Application ID from the response and set an environment variable:
- macOS
- Windows
export APPLICATION_ID=application-id from your response
set APPLICATION_ID=application-id from your response
Copy the Client ID from the response and set an environment variable:
- macOS
- Windows
export APP_CLIENT_ID=app-client-id from your response
set APP_CLIENT_ID=app-client-id from your response
Copy the Client Secret from the response and set an environment variable:
- macOS
- Windows
export APP_CLIENT_SECRET=app-client-secret from your response
set APP_CLIENT_SECRET=app-client-secret from your response
8. Running the example application
Start the backend and frontend
- Install dependencies with:
- npm
- Yarn
npm install
yarn install
- Build and run the application:
- npm
- Yarn
npm run start
yarn run start
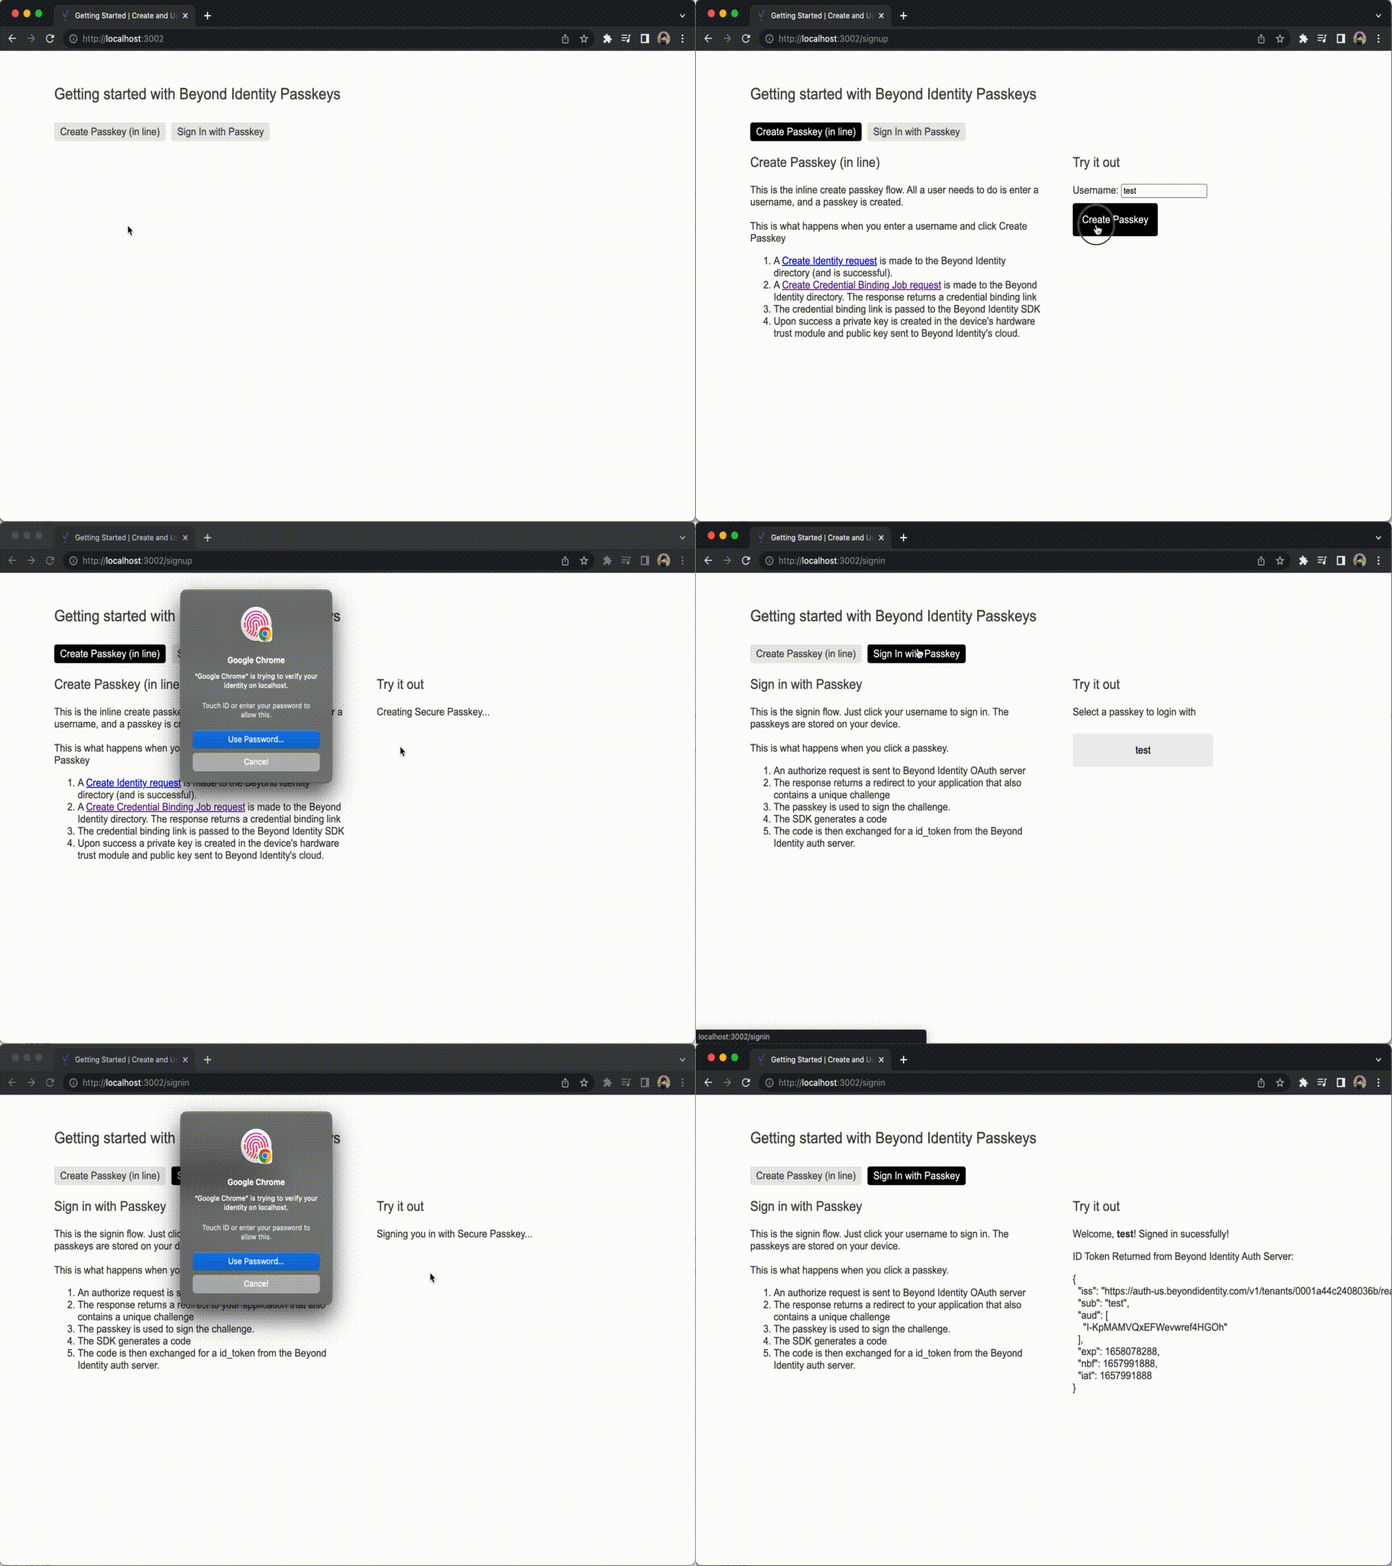
- Open a web browser and navigate to http://localhost:3002. The example application will now appear and allow you to create Passkeys in the browser.

What's next?
You can use the example application above to create one or more Passkeys and log in with them.